Video Editor

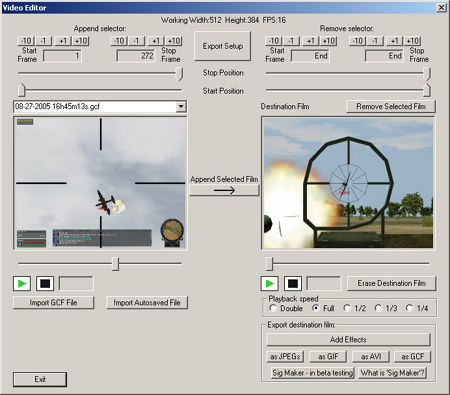
The video editor allows you to take your captured films, edit them, and then save them to different file formats.
The process starts with the source film (it is on the left). Select the start frame you want to be the beginning of the video with the "Start Position" slide bar, or the -10, -1, +1, +10 buttons. The -1, -10 buttons move the position 10 and 1 frame backwards, and the +1, +10 buttons move the position 1 and 10 frames forward. Select the end of the video with the "Stop Position" slider or the -10, -1, +1, +10 buttons. Then push the "Append Selected Film" button to copy the portion of the video you have selected into the destination film.
Use the similar controls in the destination film area to remove selected portions of film.
If you want, you can select another region of the source film and append it to the end of the source film. You can also load another film and append that film onto the end of the destination film. Note: the shareware version stamps "Demo" accross all non-GCF exports. To remove the "Demo", you must buy the full of Guncam game recorder.
New Feature! Sig Maker!
The new Sig Maker feature allows users to easily make signiture files for their
forums.
Click here for more
information, or
click here
to go to the Sig Maker help page.
Working Width/Height
This will be equal to the current unsaved film if their is one, or it will
be equal to the width/height of the first film imported. This will be the
width/height that the video will be exported as.
Export Setup Button
This opens the
Video Export Setup window.
Import GCF file Button
This allows one to import a previously saved GCF film. One can then change
between selected films in the drop down menu (currently film "May03 00h
51m.gcf" is selected)
Import Autosaved File Button
This is similar to "Import GCF file", but it allows one to quickly import
an auto-saved GCF film from the auto-save directory.
Playback speed
This will slow down the playback rate of the exported film. "Double" is double
speed. "Full" is full speed, "1/2" is half speed, "1/3" is third speed, and
"1/4 is quarter speed.
Erase destination film
Click this button to erase the entire destination film and effects.
Add effects
Click this button to go to the "
Add Effects" window. It
allows the addition of effects such as blur, speckle, dust, black and white and
line artifacts.
Export as GCF
This will save this destination film in the native Gun Cam format. This is
useful for saving the destination film before adding effects to it. You can
than reload it and start again if the effects didn't turn out as you wanted
them to. GCF compression can be chosen in the
Export Setup
window
Export to JPEG
This will export the frames in the destination film as JPEGs into a folder the
program creates. It will then open up an html page showing the frames. The JPEG
quality can be chosen in the
Export Setup window
Export to AVI
This will export the frames to an avi file. The program supports two avi
formats: MSVC and
DivX. MSVC is more likely
to be supported by your computer without any additional downloads but
DivX
is a much better format. The avi formats can be selected in the
Export Setup
window.
Export to GIF
This will export your films as animated GIFs. You can choose the frame rate of
the GIF and the GIF quality in the
Export Setup window.

