Guncam Movie Editor Help - under construction

-
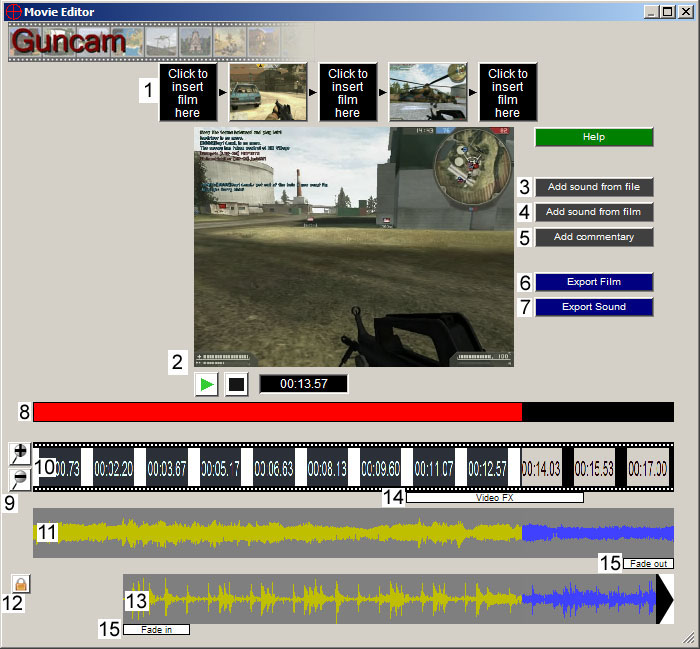
Story board - this lists the clips added to the video, and provides insertion
points for new clips. Click on the 'insert' button to add new clips, or click
on the movie thumbnail to select that clip in the film bar (number 10).
When inserting clips, you can adjust which portions of the clip you want to
add.
-
Movie viewer - This shows the video with effects. Because effects are rendered
real time, the movie displayed in this area maybe choppier than the exported
movie.
-
Add sound from file - Click this button to add sound from mp3, wav, or wma
files. This is a new feature, so please contact us if you have
problems with it. Only registered versions can export this sound.
-
Add sound from film - Click this button to add sound from a previously recorded
guncam file (gcf file). Only registered versions can export this sound.
-
Add commentary - Click this button to add a voice over commentary using a
microphone. Recording will start where the video is currently displayed, and
you can stop recording at any time by clicking the 'stop' button in the movie
viewer. Only registered versions can export this sound.
-
Export film - when you are done composing a movie, click this button to export
it to avi, animated gif, or a guncam file (gcf). Exporting to gcf is useful for
use in other movie editor projects, as there is currently no 'save' option for
movie editing. You can also insert the movie into a jpeg or bmp file using the
'Sig Maker' option.
-
Export sound - this exports the sound into a wav file.
-
Progress bar - this shows where in the film the Movie viewer is displaying
-
Zoom buttons - these buttons zoom the film and sound bars in and out for more
precise editing. Using your mouse wheel also zooms in and out.
-
Film bar - this bar is used for selecting portions of film for adding video
effects. Right-click on this bar to select a begin or end point, or to
select the whole film. When a selection is made, right-click on the
selected area to remove that portion of film, or to add a video effect to that
portion of film.
-
Sound bar (main) - this sound bar represents the audio from the film clips.
Right-click on this bar to select a begin or end point, or to select the audio
bar. When a selection is made, right-click on the selected area
to add audio effects (such as volume adjustment or fade-in/out effects). You
can even 'copy and paste' the selected area - this will appear as a new sound
bar.
-
Sound bar lock - this only appears for added sound. A locked sound bar cannot
be moved. You can place a sound anywhere in the film by unlocking it,
left-clicking on its sound bar, an then dragging it to the place you want it.
-
Sound bar (added sound) - every sound bar after the main sound bar represents
added sounds. You can select effects (like the main sound bar) by
right-clicking, and you can move these bars to any place in film (if they are
unlocked). You can also remove these sound bars by an option that comes up
after right-clicking on them. This option removes the ENTIRE sound bar. If you
want to keep portions of the sound-bar, try copy and pasting the selections you
want before removing a sound bar.
-
This represents a placed video effect. These appear below the film bar. You can
right-click on this bar to adjust the effect, or remove it.
-
This represents a placed audio effect. These appear below the audio bar they
are placed in. You can adjust certain effects (volume and custom fade) by right
clicking on it, and you can also remove this effect by right-clicking on it.
|
|


